Search

Drop Down MenusCSS Drop Down MenuPure CSS Dropdown Menu

Friday, June 30, 2017

Building Mobile Apps Using Xamarin.Forms with .NET Standard

Introduction:
The .NET Standard Library is a formal specification of .NET APIs that are intended to be available on all .NET runtimes. You can understand another way its expanded, Portable Class Library. It is a single library with a uniform API for all .NET Platforms including .NET Core. You just create a single .NET Standard Library and use it from any runtime that supports .NET Standard Platform.
You can refer following table lists all the versions of .NET Standard and the platforms supported
In this article, you will learn how to create mobile cross platform application using Xamarin Forms with .NET Standard libraries and maximize code sharing.
Create New Xamarin Forms:
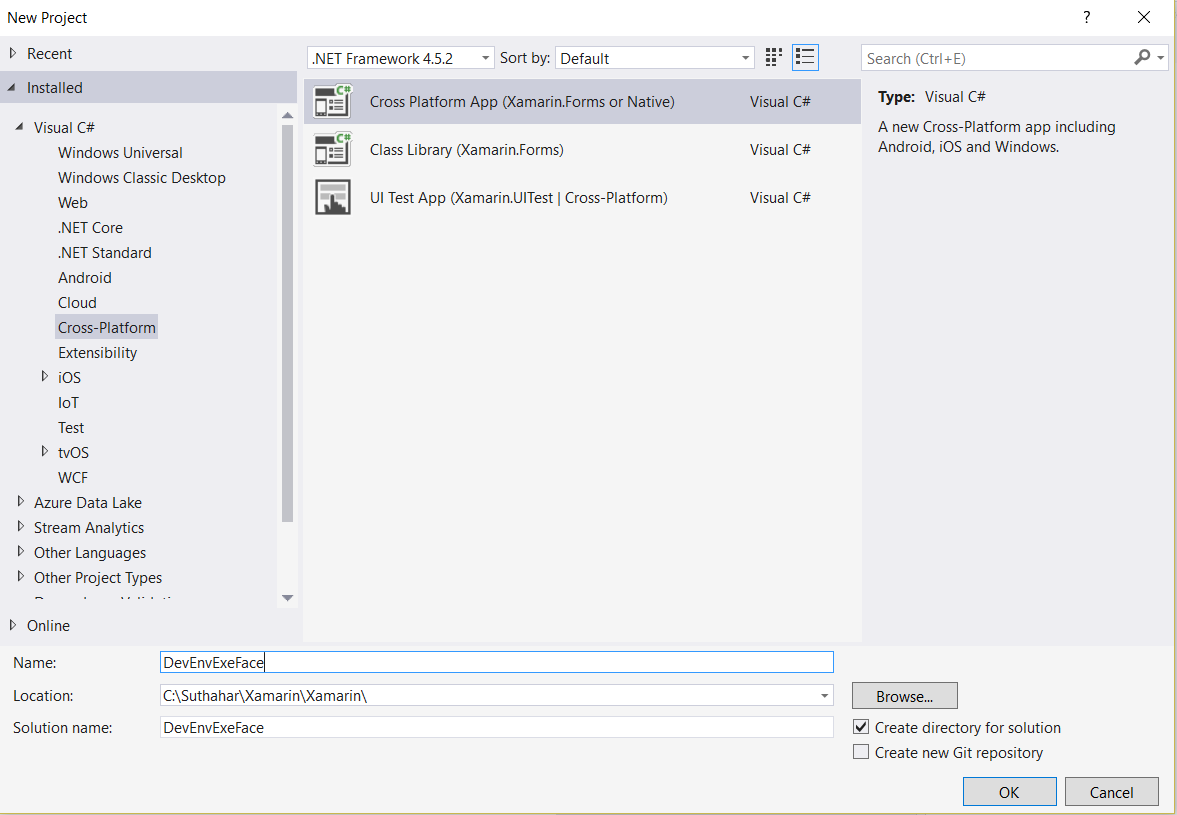
Let’s start create new Xamarin Forms application, In Windows machine > Go to Run (Windows key +R) > type Devenv.exe for open Visual Studio and select New project from File menu > New Project (ctrl +Shift+N) or click More project template from VS Start screen.
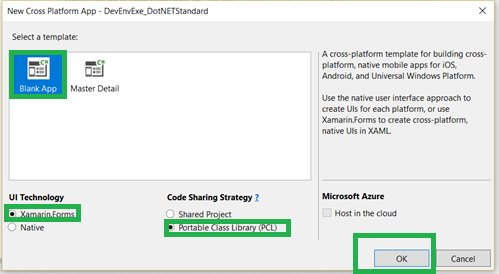
Click on Ok > You will get following screen. Select Blank App > Select Xamarin Forms UI Technology > Select Code sharing as PCL or Share Project and click on Ok
After click on Ok, VS will automatically create PCL,iOS,Android ,UWP projects .
Create .Net Standard Class library
You can follow below steps for create .Net Standard library,
Right Click on solutions > Add new project > Create Class library (.Net Standard) that targets .net Standard and click on Ok

Install Xamarin Forms in .Net Standard library:
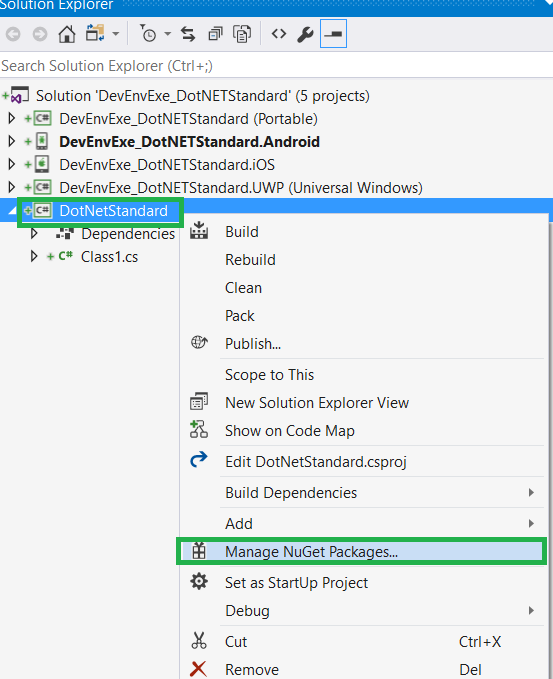
The Xamarin.Forms 2.3.5-prerelease will support with .NET Standard. Right Click on .net Standard library > Select on Manage Nuget package
Select on Browse tab > Search text ‘ Xamarin.Forms ‘ > Select Include prerelease and select Xamarin Forms and click on Install
Customize the Application:
You can follow below steps for customize the platform specific project and .net standard library.
Step 1:  Right Click on .Net Standard library > Click on Add Item > Select Cross -Platform >Forms Blank Content Page Xaml > Provide name as MainPage.xaml
Step 2: You can add UI design as per your requirement in MainPage.xaml .
  1. <?xml version="1.0" encoding="utf-8" ?>
  2. <ContentPage xmlns="http://xamarin.com/schemas/2014/forms"
  3.             xmlns:x="http://schemas.microsoft.com/winfx/2009/xaml"
  4.             x:Class="DotNetStandard.MainPage">
  5.    <Label Text="Welcome to Xamarin.Forms Apps with .NET Standard!"
  6.           VerticalOptions="Center"
  7.           HorizontalOptions="Center" />
  8. </ContentPage>
Step 3: Copy App.cs and App.xaml from PCL or Shared project and past into .net Standard library and change the namespace from xaml and c# page
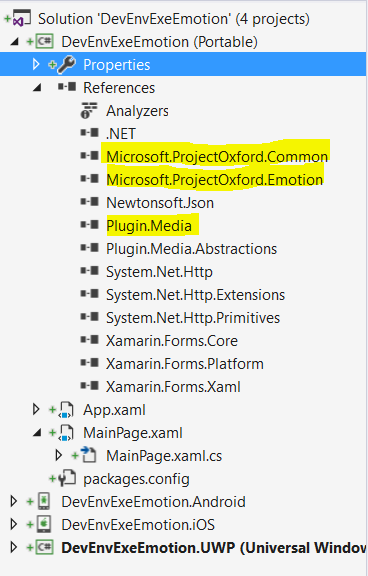
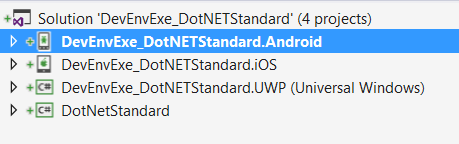
Step 4: Remove Shared or PCL Project and Remove PCl project reference from all iOS,Android,UWP project. Now solution look like below
Step 5: Add your .Net Standard class library reference to iOS,Android,UWP project.
Step 6: Change namespace from following project
  • In UWP project, updated the namespace from mainPage.cs
LoadApplication(new DotNetStandard.App());
  • In Android Project , Update the namespace from Main Activity
LoadApplication(new DotNetStandard.App());
  • In iOS Project , Update the namespace from Appdelegate
LoadApplication(new DotNetStandard .App());
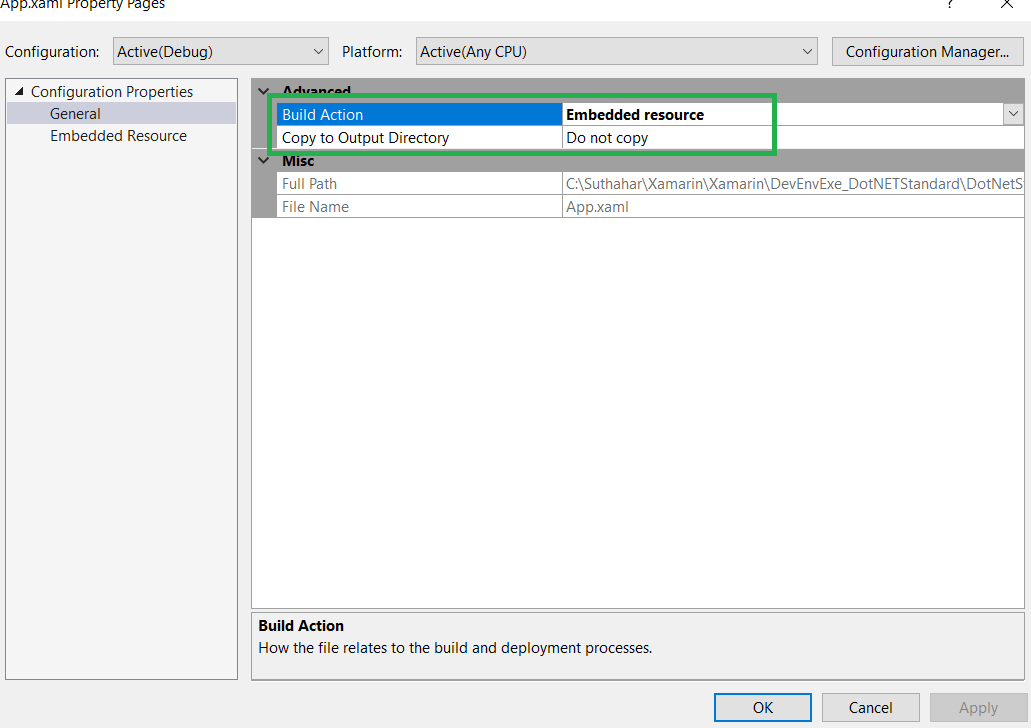
Step 6:  If you get following error while build the project
You can follow below for resolution Right Click on Xaml page > Select property and Build Action Should be Embedded Resource

Run the Application:

You can run the application (iOS,Android ,Windows) to all the platform


Summary
In this article, you learned how to create mobile cross platform application using Xamarin Forms with .NET Standard libraries.
If you have any questions/ feedback/ issues, please write in the comment box.


Wednesday, June 28, 2017

Emotion Recognition in Xamarin.Forms with Microsoft Cognitive Services

Introduction:
Microsoft Cognitive Services offer awesome APIs and services for developers to create more intelligent applications. You can add interesting features, like people's emotions and video detection, face, speech, and vision recognition and speech and language understanding into your application.
The Emotion API takes a facial expression in an image stream as an input, and returns confidence levels across a set of emotions for each face in the image like anger, contempt, disgust, fear, happiness, neutral, sadness, and surprise, in a facial expression
Where we Can implement:
There is no single unifying definition or theory of emotion. Nevertheless, several characteristics of an emotional reaction are frequently mentioned. Nowadays feedback is more important for product promotion and review the article, store, etc. manual entry of emotion maybe wrong so we can automate the feedback and review.
In this article, we can learn about how to implement Emotion Recognition in Xamarin.Forms with Microsoft Cognitive Services.
Getting Started with the Emotion API:
The Emotion API can detect anger, contempt, disgust, fear, happiness, neutral, sadness, and surprise, in a facial expression. As well as returning an emotion result for a facial expression, the Emotion API also returns a bounding box for detected faces using the Face API. If a user has already called the Face API, they can submit the face rectangle as an optional input. Note that an API key must be obtained to use the Emotion API. You can follow below steps for obtained at free API key on Microsoft.com
Step 1: Click here for Generate Subscriber Key and Click on Create
Step 2:  You can agree the terms and Microsoft privacy statement > select the country and click on Next
Step 3: Login with Microsoft /LinkedIn /Facebook /Github  for create your API

Step 4: You login and subscribe you should see the keys and the below information on available your subscriptions


We will use emotion API key in the following Xamarin application. before that we can test the API key
Test on Your Emotion Key:
You can navigate emotion API online console application and provide the subscription key and image url . if your provide valid key and input the image, you will get it JSon data as output or relevant error


Create New Xamarin Forms Application:
You can refer my previous article for setup and create new Xamarin forms application.
If you already installed VS on your machine, Open Visual Studio > Create New Xamarin Forms application like below


Solution will create with all the platform and PCL project
In this solution, we are going to create demo application for Article review automate based on the emotion.
Camera in Xamarin. Forms:
We can use Media.Plugin Nuget package for Capture image or select image gallery from all the mobile platform (iOS,Android,Windows)
Right Click on Solution > Type “xam.plugin” in the search box > Select all the project (PCL, iOS, Android and UWP) > Click on Install
Emotion Nuget Package:
This client library is a thin C# client wrapper for the Microsoft Emotion API.The easiest way to use this client library is to get microsoft.projectoxford.emotion package from nuget .
Right Click on Solution > Type “Microsoft Emotion” in the search box > Select all the project (PCL, iOS, Android and UWP) > Click on Install
UI Design:
After successfully install above two nuget package. Let start UI design from PCL project
In PCL Project > Open MainPage.Xaml page and design following xaml code
  1. <?xml version="1.0" encoding="utf-8" ?>
  2. <ContentPage xmlns="http://xamarin.com/schemas/2014/forms"
  3.             xmlns:x="http://schemas.microsoft.com/winfx/2009/xaml"
  4.             xmlns:local="clr-namespace:DevEnvExeEmotion"
  5.             x:Class="DevEnvExeEmotion.MainPage">
  6.    <StackLayout Margin="20">
  7.        <StackLayout Orientation="Horizontal" Padding="30" HorizontalOptions="CenterAndExpand" >
  8.            <StackLayout x:Name="emotion">
  9.            <Label Text="Reader is :"  FontSize="Large"/>
  10.            <Label x:Name="emotionResultLabel" FontSize="Large" />
  11.            </StackLayout>
  12.            <Button Text="Share Your FeedBack" Clicked="OnFeedBackClicked"></Button>
  13.        </StackLayout>
  14.        <Image x:Name="image" Source="article.png" />
  15.        <ActivityIndicator x:Name="activityIndicator" />
  16.    </StackLayout>

  17. </ContentPage>
In mainPage.xaml.cs file add your logic.
  1. public partial class MainPage : ContentPage
  2.    {
  3.        EmotionServiceClient emotionClient;
  4.        MediaFile photo;

  5.        public MainPage()
  6.        {
  7.            InitializeComponent();
  8.            emotion.IsVisible = false;
  9.            emotionClient = new EmotionServiceClient("7f495be5faf643adbeead444d5b79a13");
  10.        }
For capture image, write the following code
  1.     public async Task CaptureImage()
  2.        {
  3.            await CrossMedia.Current.Initialize();
  4.            emotion.IsVisible = false;
  5.            // Take photo
  6.            if (CrossMedia.Current.IsCameraAvailable || CrossMedia.Current.IsTakePhotoSupported)
  7.            {
  8.                photo = await CrossMedia.Current.TakePhotoAsync(new StoreCameraMediaOptions
  9.                {
  10.                    SaveToAlbum = false
  11.                    
  12.                });

  13.            }
  14.            else
  15.            {
  16.                await DisplayAlert("No Camera", "Camera unavailable.", "OK");
  17.            }
  18.        }
For Recognize emotion, write the following code
  1. public async Task Recognizeemotion()
  2.        {
  3.            try
  4.            {
  5.                if (photo != null)
  6.                {
  7.                    using (var photoStream = photo.GetStream())
  8.                    {

  9.                        Emotion[] emotionResult = await emotionClient.RecognizeAsync(photoStream);
  10.                        if (emotionResult.Any())
  11.                        {
  12.                            // Emotions detected are happiness, sadness, surprise, anger, fear, contempt, disgust, or neutral.
  13.                            emotionResultLabel.Text = emotionResult.FirstOrDefault().Scores.ToRankedList().FirstOrDefault().Key;
  14.                            emotion.IsVisible = true;
  15.                        }
  16.                        photo.Dispose();
  17.                    }
  18.                }
  19.            }
  20.            catch (Exception ex)
  21.            {
  22.                Debug.WriteLine(ex.Message);
  23.            }
  24.        }
While click on Feedback button, call the above two methods
  1.  async void OnFeedBackClicked(object sender, EventArgs e)
  2.        {
  3.            //capture image
  4.            await CaptureImage();
  5.            ((Button)sender).IsEnabled = false;
  6.            // Recognize emotion
  7.            await Recognizeemotion();
  8.            ((Button)sender).IsEnabled = true;
  9.        }
Run the Application:
Select the iOS /Android /Windows and install into the device and click on ‘Share your Feedback ‘button


The device should be camera so after click on the button, capture your face for Recognize emotion.
Download Source Code:
You can download the complete source code from MSDN sample. 
Summary:
In this article, you learned about how to generate emotion API key and implement Emotion Recognition in Xamarin.Forms with Microsoft Cognitive Services.
If you have any questions/ feedback/ issues, please write in the comment box